Setting off from the Spanish provinces from the bullrings on a journey around the world, the bolero, as an exceptionally interesting piece of clothing, we can safely use our skills in handling crochet and yarn. It is with the help of this knitting tool that you can get a wide variety of designs, even if you use one model pattern, for example, a circular bolero.
Thanks to the circular knitting method, such a bolero is not only easy to knit, but it also fulfills its role very effectively, because the edges of the circle are at the same time a luxurious turn-down collar, a rounded back and rounded shortened shelves of this model. That is why I would like to offer several different models of circular boleros with different knitting patterns.
On the topic of circular boleros, in which you need to start knitting from the center and develop it in a circle, it was discussed in the article “How to crochet a circular bolero. Simple models." This time we will start the circular bolero not with a circle, but with a rectangle. That is, the back of the bolero is knitted rectangular, which will look like a more classic option for a bolero jacket. In this case, the collar and binding of the shelves and the bottom of the product are carried out in a circle, so in general this bolero looks circular.
Black circular bolero with a rectangular back.
Let's start with a simple model with a rectangular sleeveless back. We use black wool yarn with the addition of mohair, or smooth wool yarn. However, absolutely any yarn that is on hand in a volume of 450 - 500 grams is suitable for this model; such a bolero will be good in any design and in any color.

We cast on a string of air loops of such length that it makes up the distance along the back from armhole to armhole. This distance can be measured on a sweater or jumper that fits you. Then we knit a rectangle with loose mesh stitch, for example, alternately 4 double crochets, 3 chain stitches. The height of the back is determined by your desire for the length of the bolero. A convenient and relevant length of the rectangular part of the back of such a bolero should end just below the lumbar area.

Following the back, we begin to knit the armholes, from this moment circular knitting begins. We collect air loops from the corner of the rectangle, determining their number so that when connected to the lower corner of the rectangle, our knitting does not wrinkle or fold in half. We connect to the bottom corner, knit with simple stitches along the bottom side, repeat the steps to form the second armhole.

Thus, we get an oval shape, along which we will continue knitting in the round.


For this simple bolero model, we choose a repeat pattern of 22 loops. We continue to knit in circles until we get the desired volume of the item.


To decorate such a bolero, and to designate the area of its collar, because it turns out to be absolutely symmetrical, you can add a decoration in the form of a rose or chrysanthemum, knitted from the same or color-matched yarn, to the edge of the collar.
Terracotta circular bolero with a rectangular back and ½ sleeves.

Having tried one principle of knitting a circular bolero with a rectangular back without sleeves, you need to move on to the next stage - knitting a circular bolero with a rectangular back and ½ sleeves. The presence of even shortened sleeves completely changes the appearance of the bolero, turning it into a bolero-jacket.
For this model we use terracotta colored yarn, although the choice of color and thickness of yarn is yours. You should not use yarn that is too thick or too thin; threads with long or thick pile, such as “grass”, “plush”, etc., will also not look very suitable here. In our case, we take 600 grams of wool and cashmere yarn, the thickness of the thread is 400 m per 100 grams, and hooks No. 2 for knitting the back and No. 2.5 for knitting the design in the round.
We start by knitting a rectangle, in this case we get a tight knitting, column to column. Model dimensions from size 48 to 52 are shown in the figure.
.jpg)
Fold the finished rectangle in half, mark the dimensions for the armholes on it and sew the top and bottom. Next, we can begin tying the bolero in a circular pattern according to the diagram in the figure.

This pattern is used for knitting in the round the outline of both the bolero itself and the armholes for the sleeves.
Finally, we knit a dense cord or braid 60 cm long from the same yarn, because The finished bolero requires fastening on the chest with a laconic knot.
We get a practical item for warmth, which at the same time looks festive and catchy, and will be your lifesaver for cool weather.
Crochet black openwork bolero from a rectangle (square)
Crocheting a bolero is not at all difficult for beginners. It is not necessary to know how to knit armholes or adjust bolero according to the model. This bolero is knitted from a rectangle.
I showed an example of such a bolero crocheted from a square in the article It’s easy to crochet an openwork bolero (from a square).
Now I want to show how I crocheted a bolero from a rectangle. My friend ordered this bolero for me.
The essence of knitting is the same as in the case of a square, even simpler.
1) We knit a rectangle of the required size (the width of the rectangle is equal to the width of the back from shoulder to shoulder plus 10-15 cm, the height of the square is the circumference of the arm at the widest point plus 5-7 cm for freedom).
2) Fold the rectangle lengthwise and connect it as follows (we make 2 seams - shown in dotted lines)

There are no sleeves in this bolero; initially it is knitted a little wider than the back, and then they fit as in the photo. If you still want longer sleeves, then read the link above. It’s easy to crochet an openwork bolero (from a square). But then you need to choose a different pattern so that you can beautifully and discreetly tie the sleeves.
See for yourself how long your seams will be. I got an 8cm seam, but the length of the bolero is long, it could be shorter. If you want a long bolero, then focus on the length of the back, subtract the width of the armhole, and sew up the rest. If it’s short, then it’s the width of the armhole. Measure the width of the armhole you need, knit a rectangle of the desired height: armhole width plus, for example, 6-10cm. Then the length of the seam will be 3-5 cm. This will be enough (the binding will also be added).
3) We tie the armholes and boleros along the contour around a beautiful ruffle.
Now let's move on to the details.
I crocheted this black bolero No. 2.75 from Summer yarn 350m/100g.
Review of Summer yarn:
I liked the yarn, even though it was clingy at first. But then, apparently, I got used to it. She looks very beautiful in the product. Knits quickly, because... The yarn is quite bulky. After wearing, the bolero sagged down a little, so you need to take this into account when calculating the height of the rectangle or knitting it more tightly or choosing a different pattern (although I really like mine! I even want to try using Summer and crochet a cocktail dress with this pattern).
The pattern I chose is:

Scheme of this pattern for a bolero:

I knitted a rectangle, connected it in the right way, tied the bolero along the contour with binding 1 (see below) and the armholes with binding 2 (see below). The result is this bolero:


Binding 1 (ruche edge of the bolero):

For this binding you need a number of loops that is a multiple of 6. That is. First, we make a preliminary row of single crochets, in which, if necessary, we place the edge of the bolero so that it does not stretch and bring the number of loops to the required number, a multiple of 6.
Then we start knitting a ruffle:
1st row - st. double crochet;
2nd row - st. with a double crochet, and in each st. of the previous row, knit 2 double crochet stitches.
3rd row - st. with a double crochet, at the same time, in every 3rd double crochet stitch, knit 2 double crochet stitches.
4th row - *1 stitch, skip 2 stitches. the previous row, in the next we knit 5 stitches. double crochet, skip 2 tbsp. previous row* - repeat from * to * until the end of the row. !!! At the beginning of this row, replace the first connecting stitch with 1 ch.
Binding 2 (ruching the edge of the sleeve):
Similarly to tying the 1st edge of the bolero, we knit a preliminary row, in which we bring the number of loops to a multiple of 6.
We knit the 4th row from the 1st edge of the bolero.
And here is the owner of the bolero in her new thing.


http://platiatut.ru/2012/05/bolero-kruchkom-iz-kvadrata.html
Bolero is a type of shortened jacket. It does not fasten and is more likely to add zest to the outfit than for warmth.
The first boleros appeared about three hundred years ago in the wardrobe of Italian bullfighters. Women at that time were not much different from modern ladies: they also wanted to look interesting and attractive. Without hesitation, they borrowed the idea of an interesting cape from the courageous bullfighters, but added a little decor.

Playing with styles and colors led to the fact that the bolero was to everyone’s taste and appeared in the wardrobe of every fashionista.

Despite the fact that it is no longer the 18th century, women still love bolero. But it is not always possible to purchase a suitable option, so craftswomen ask themselves the question: “How to knit a bolero with your own hands?”

Where to begin?
The first thing you need to decide on is the model and style of the bolero. It can be fur, leather or fabric, with long or short sleeves or completely sleeveless.


The knitted bolero with short sleeves is still at the peak of popularity. Patterns and descriptions of knitting for beginners and experienced craftswomen can be found on websites and forums, but we tried to collect the most interesting things for you.

Let's decide which pattern you will knit.

What is better to knit a bolero for beginners: crocheting or knitting? In fact, there are easy-to-knit models in both ways. Therefore, we offer both options.

Simple crochet bolero
The easiest way to knit a bolero is with a square. You don't need a pattern for this. It is enough to simply knit a square (with any pattern). Its size is approximately 50 by 50 cm, size 44 for a figure.

The knitting process is simple and will be understandable to any knitter, and detailed instructions on how to crochet a bolero will help you achieve the best result.
- Cast on 15-50 loose stitches;
- Knit them by choosing any pattern;
- When the square of the desired size is ready, fold it in half;
- Set aside armholes on the sides (at the fold), and sew everything below;
- If you need sleeves, tie the armholes around to the desired length (in the same pattern as the bolero itself).
- Cut the thread and pull it through the outer loop, do not forget to tighten the knot.

That's it, the bolero is ready!


Simple bolero knitted
The simplest bolero can be knitted using satin stitch, but it will not look very presentable. But if you choose “grass” yarn, the product will turn out interesting. It can be knitted using satin stitch, because the pattern under the fibers will still not be visible.

Grass bolero
- To begin, prepare everything you need: 2-3 balls of yarn (200-250 g), long knitting needles with stops, circular knitting needles with about a meter of cable, needles and pins for stitching.
- Cast on 120 stitches and knit 100 rows. Be sure to pull the “lint” out to the front side.
- Knit the rectangle, close the loops and prepare the product for assembly.
- Fold the product in half, leave armholes and sleeves, and sew the rest.
- Turn the bolero right side out and straighten the lint.

Openwork bolero
All girls, regardless of age, love lace. An airy openwork bolero looks much more advantageous and interesting than a lace one. It is more difficult to implement than the products presented above, but the result is worth the effort.

So, a master class on knitting a bolero for the summer.

Prepare everything you need: 100% cotton yarn (240 m in 50 g) - 60 g, hook - No. 1.5.

Make a pattern and make all size changes in accordance with it.


Shelf: cast on 76 chain stitches and leave three for lifting. Use a “wave” pattern (see diagram 1). Each shelf should have 4 waves. We knit the neckline according to pattern 2.

Back: cast on 171 stitches and add 3 more on the instep. When knitting, follow the pattern. There should be a total of 9 waves on the back. Leave an armhole 3-4 cm deep on the collar, then tie it.

Assembly: sew the parts of the product together. For tying, make a ribbon in accordance with diagram 3. Sew it to the bolero. Use 2 pieces for ties.


What to wear with a bolero?
Bolero is a universal thing. With its help you can add brightness or tenderness, unusualness or severity to any outfit.

The most successful combinations with boleros are:
- knitted dresses;
- fitted turtlenecks;
- jeans, tapered trousers;
- tight skirts.


For footwear, it is better to prefer shoes or ankle boots, although playful youth models can also be worn with sneakers or trainers.


Few people know that a snow-white openwork bolero can make a bride’s wedding dress more sophisticated. It will make the dress sparkle in a new way and make it interesting.

In addition, any accessory or piece of clothing made by yourself is unique and inimitable, and on your wedding day this is especially important. A photo of a bolero in a wedding look convinces of the need for its presence on the fragile shoulders of the bride on the most important day.

Photo instructions on how to crochet a bolero


On the Internet there are a lot of options for how to knit a bolero. There are many ways and techniques. A bolero can highlight the waist, hide imperfections and give a fresh look. Such a wardrobe item will always delight others, especially if it is made with its own sleeves. Let's look at several crocheted bolero options for women. Some of them can be completed in one day, while others require more time.
Learning the Basics
On overweight women, a shortened openwork bolero model will look good, as it will set accents and visually hide imperfections. Let's consider one of the options for how to knit such a bolero.
We will need:
- cotton yarn 350 grams (250 meters per 100 grams);
- hook No. 3.5.
Let's start the master class with diagrams and patterns. The bolero will be made using this pattern.
If necessary, the parameters can be changed. Only the number of report loops should be taken into account.
We begin work on knitting the back. The data below the pattern diagram will be used. We knit 107 air loops, add 3 air loops for lifting and then knit according to pattern No. 1.

After 7 cm, you should reduce the row by about 3 cm. This is done for the armholes. We knit 6 loops on each side with double crochets. From the beginning of the armhole we knit 21-22 cm. We fasten the thread and cut it. Let's start making the left shelf. We knit 57 air loops, plus 3 lifting loops. We knit the second row according to pattern No. 1. We make an armhole, decrease the loops as it was done on the back. For the neckline, simultaneously with the armhole, we decrease the 1st loop 18 rows in a row. Due to the decrease in stitches, the pattern may become distorted. In order to preserve it as much as possible, we knit the loose loops with double crochets. When the work reaches 21-22 cm, the thread can be secured. We knit the right front using a similar method. Everything is done exactly the same, only mirrored.
Let's start working with the sleeve. We cast on 8 g of air loops, lifting loops and knit 4 cm according to figure No. 1. To roll back the sleeves, we retreat 6 loops on each side and bind off 2 times with 3 loops, in the next row we close 9 times with 2 loops, then 2 times with the 1st loop. We knit according to the pattern 15-16 cm from the beginning of knitting the rollback. Fasten the thread. We perform the second sleeve in the same way. When all the parts are ready, you can begin assembly. The shoulder seams are done first. Next we sew in the sleeves and sew the side seams. Sew the sleeve seams.
You can start tying the bolero. We start tying the bottom from the corner according to pattern No. 2. We tie the remaining edges like this:
- a row of single crochets;
- single crochet, * skip 3 loops and in the 4th loop knit 7 double crochets, skip 3 loops, knit a single crochet *. Repeat from * to *.
Bolero for obese women is ready!

Product made from motifs
For beginner knitters, a good option would be to make a bolero from motifs. Let's look at making such boleros using simple diagrams.
From round motifs

For this work you will need 300 grams of cotton yarn with a density of 170 meters per 50 grams and a hook number 2.5.
Bolero elements are knitted in the round according to this pattern. The photo also shows an example of tying the finished product.

The bolero is assembled according to this pattern.

From the square


In order to knit such a bolero, you will need 10 square motifs. To increase the size, motifs can be added both in width and in length.
An example of the motif used and the binding of the finished bolero:

Assembly diagram. The squares are sewn together one by one. The least amount of breaking of the gather thread should be done.

Circle bolero
A bolero crocheted in the round can be a festive and simple option. Knitted according to the napkin principle, its size and appearance can be very easily adapted to a woman’s individual parameters.

In this example, sizes 44-46, 360 grams of cotton yarn were used. The work was done with crochet size 1.75.
Before you begin, you should edit the proposed pattern to suit your parameters.
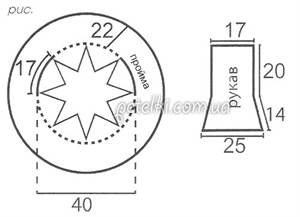
According to pattern 29, a circle is knitted, the diameter of which will be about 40 cm. Next, we knit a separate thread from air loops of about 17 cm and sew it to the armholes.

We continue to knit according to pattern 29a.

Pattern 296 is designed for knitting sleeves.

The bottom of the bolero should be designed according to this pattern. Moisten the finished bolero and let it dry. Ready.

From a rectangle
This type of bolero is the easiest to make. You can certainly knit it, if not in one evening, then in one day. To do this, knit a rectangle with the selected pattern. The width of the rectangle is determined by the width of the back from shoulder to shoulder plus 15 cm. The height of the triangle is equal to the circumference of the arm at the widest point + 7 cm. It is sewn in 2 places according to the diagram. A rectangular bolero can be both casual and festive.


For experienced knitters, we will offer several options for beautiful boleros. Below you will find diagrams and descriptions of the work in pictures.


Every fashionista's wardrobe should have such a spectacular item as a bolero. This cropped jacket can be made from fabric or crocheted and knitted. The bolero may not have sleeves or, conversely, completely cover the arms. There can be a lot of variations. One thing remains the same - it has no clasp.
It is enough to simply crochet a bolero. Just choose the right type of yarn and a suitable hook. Bolero can be worn at any time of the year. For a summer cropped jacket, it is better to choose cotton or linen yarn. Silk threads are also suitable as a material. In order to knit a warmer bolero, it is better to choose a thread that contains wool.
Crochet bolero: a method for beginners
We offer a simple model of an openwork bolero without sleeves, knitted with single crochet stitches. This version of this outfit is quite romantic; it goes well with dresses and skirts. Another advantage of this model is that it only takes 60 g of yarn. This amount will make a size 42 bolero. It is better to choose thin threads - 200 m in 50 g.
- On hook 3 we cast on 35 loops. 3 of them will go up, over the rest we will knit the 1st row of bolero.
- In the 1st row, insert the hook into the 32nd loop (4th loop from the hook) and knit a double crochet stitch. We do the same with the previous loop. Then we put 2 chain loops on the hook, skip 2 loops of the 1st row, and knit 3 double crochets into the next 3 chain loops. We have a rapport. Repeat this step until the end of the row (you should get 5 repetitions).
- At the beginning of the next row we cast on 5 chain stitches. We knit 3 columns, stretching the hook under the arch between the 2 columns of the previous row.
- We cast on 2 air loops and knit 3 stitches into the next arch. We knit this way, repeating the rapport, until the end of the last loop of the row (4 repetitions). We cast on 2 air loops, 1 stitch in the last loop.
- Row 3: cast on 3 loops, knit 2 stitches into an arch. Rapport: 2 air loops, 3 columns in the arch. We knit rapport to the end of the row. You should get 6 repetitions.
- In the 4th row we repeat knitting 2 rows, in the 5th row we repeat 3 rows. We knit a rectangle 34 by 12, alternating knitting 2 and 3 rows.
- We form the strap: cast on 107 loops. We lower the chain down and connect it to the lower corner with a connecting post. We knit the bottom of the bolero with a half-stitch to move to the other corner. We cast on 107 loops and also connect them to the lower corner with a half-column. The result is a rectangle with 2 straps.
- We tie the straps and the lower part of the bolero, moving from right to left: cast on 5 chain loops, knit 3 stitches in an arch, 2 loops, 3 stitches in an arch - repeat 2 loops/3 stitches until the end of the row. On the straps, after 3 stitches, we cast on 2 loops, skip 2 loops and knit 3 stitches again. We finish the row with a half-column, stretching the hook into the 1st chain loop of the beginning of the row.
- Last row, bolero binding: cast on 3 chain stitches, knit 2 stitches into the arch of the previous row; *3 loops and 3 stitches in the same arch. 2 loops and 1 stitch in the next arch of loops * - repeat repeat from * to the end of the row.
- Finish the row with a half stitch in 1 loop of the beginning of the row. Cut the thread, pull it through the last loop and tighten. If you want the straps to be wider, then continue repeating the last row until the desired width.
Crochet bolero: pattern for women

This is an easy crochet bolero for beginner knitters that doesn't require much experience. In addition, a short jacket can be simply knitted to fit any figure without a pattern. It is enough to take a few measurements - the height of the bolero and its width. The item will be modeled from a square. For size 44, it is enough to knit a fabric of 51 by 51 cm with any, even the simplest pattern.
Just cast on 15-20 chain stitches and knit them in any pattern (even a regular single crochet may work). Calculate the required number of loops by measuring the workpiece. Cast on the required number of loops and knit a square. Fold the canvas in half. We measure armholes on the sides. They should be located near the fold of the fabric. We stitch everything below.
We form the sleeves. To do this, we tie the resulting unsewn armholes in a circle with the main pattern. We knit until the sleeve of each armhole is the desired length. Cut the thread, pull it through the last loop and tighten the knot. Bolero is ready!
Crochet bolero: patterns


Most boleros are knitted according to patterns. They usually indicate patterns that correspond to different parts of this short jacket. Next to it is a pattern of the finished product. The resulting bolero should match it. To do this, after knitting, it is washed in warm water by hand, the water is allowed to drain, and the wet product is laid out according to the pattern. In order for it to keep its shape and strictly correspond to the size, it can be blocked with pins. In this case, the pattern must be placed on something soft. Some craftswomen do this on an ironing board.
In order for the thing to work, you need to learn how to read diagrams. Usually they indicate the beginning of knitting with a small arrow or number. You can also notice horizontal lines in the diagram. They highlight rapport - a pattern that must be repeated the required number of times.
If you are uncomfortable knitting according to patterns, then you can make a bolero using the freeform technique. You can start from the fact that the product can be formed from a square. Simply start knitting a fabric in loose patterns, then form it into a square, fold it in half and sew the side seams. For armholes, you can retreat about 9 cm on the sides from the fold. This part does not need to be sewn up.
You can also knit a bolero using motifs without a pattern. Motifs are small figures in the form of circles, squares and polygons, which are made separately. They are knitted very simply and are used mainly for decorative purposes. However, they can also be used to make clothes. It is enough to connect the required number of motifs and connect them on all sides with other motifs. At the same time, for such knitting it is better to choose yarn of medium thickness so that it holds the pattern.
Crochet bolero: photo


Crochet bolero: video
Bolero is a universal wardrobe item. It can be worn with dresses of different styles (from bandage dresses to long summer sundresses), jeans, and office wear. Of course, for each set you need to select a product that suits the style. Crocheted boleros are most suitable for romantic looks. They fit perfectly into the boho style. The bolero can be complemented with a beautiful brooch or flowers, also crocheted.
The bolero is used not only to keep warm. This feminine garment adds a touch of flair to your look. Crocheted short jackets look especially elegant. They can be performed both according to the scheme and without it. The simplest option is to knit a square in a random pattern. Then the crocheted bolero is folded in half and stitched on the sides until the armholes begin.