Beads are a decoration for all times! You can easily make beads with your own hands. Of course, as in any business, there are tricks and nuances here. On our website, we have long been collecting master classes on making beads using various techniques, as well as lessons on assembling them.
We invite you to familiarize yourself with these materials by tags, as well as by search query.
In the photo you see knitted beads made by a craftswoman under the nickname
What are beads usually made from? Of course, from beads! By the way, as in any business, there are tricks and secrets here. For example, you are planning to do DIY beads. What to string the beads on? Which lock to choose and how to secure it? These questions will definitely arise for beginners. Well, if you want to make the beads more interesting, then without master classes on bead assembly there's simply no way around it. Today we have made for you a selection of useful lessons that will help beginners figure out how to make beads with their own hands, as well as learn some tricky craft techniques.

How to make necklaces from beads with your own hands. Master classes
How to make beads: tips for beginners from the website "Fair of Masters"
DIY bead necklace. Video master class from Galina Pchelka:
DIY necklace in Chanel style from the "Marine DIY Guloyan" channel:
DIY beads. Master Class from the site "Vsembusiki.ru"
How to fix beads:
Discussion of the article
Learn how to make beads with your own hands from different materials - wool, beads, leather, paper, and even T-shirts. And to help you - master classes and 53 photographs!
How to make beads with your own hands from wool?

The felting technique is interesting and amazing. Look what a beautiful decoration you can make with it. These beads look like rolls. Let others wonder what these accessories are made of, but don’t immediately tell them the secret.
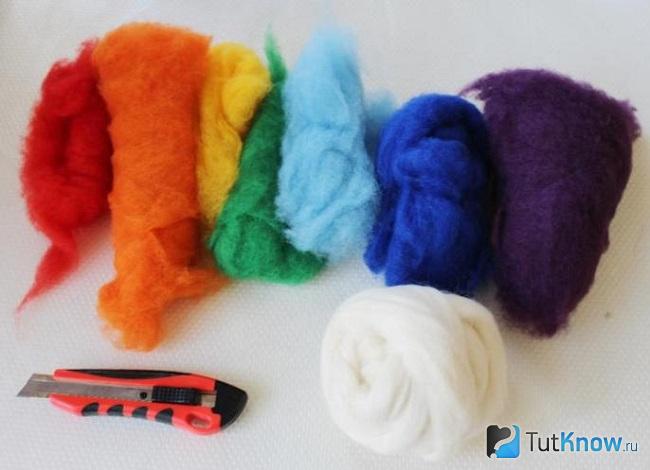
At first, only you will know what you needed to make them:
- wool of various shades;
- bubble wrap;
- rubber mat;
- stationery knife;
- bamboo mat;
- small towel;
- mesh
The presented technique allows you not to throw away the pieces of wool left over from needlework, but to put them to use.
Pinch off small strands and arrange them evenly in one row. Choose according to color scheme. For example, first lay lilac, blue, light blue wool, then green, yellow, orange, red.
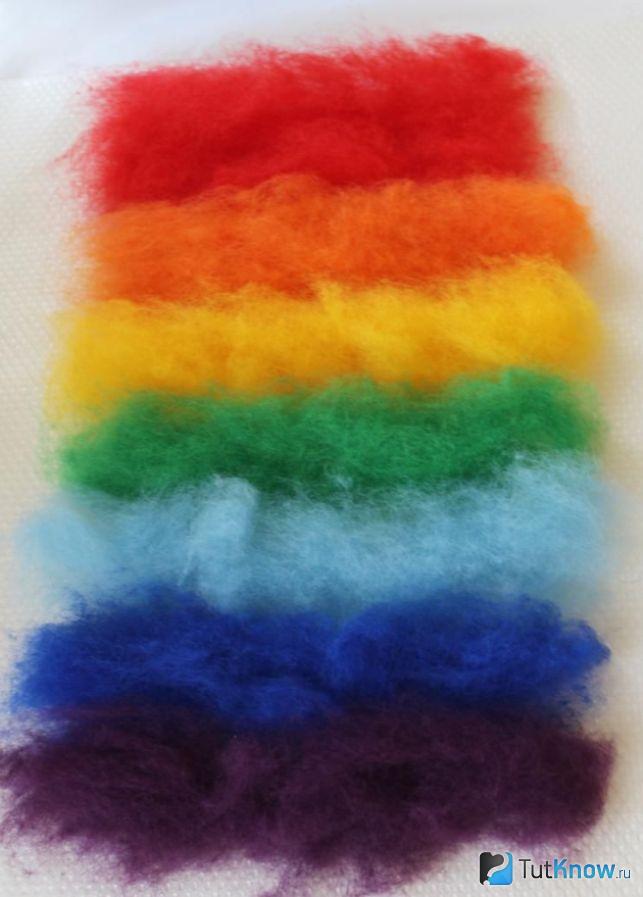
This blank canvas should have a size of 30x22cm.
The red stripe will be on the edge, it is a little wider than the rest, and why, you will learn about this a little later. In the meantime, we continue to make beads - a decoration that looks extraordinary.
Cover the resulting workpiece with a net, sprinkle with the prepared soap solution, and rub with your hands.
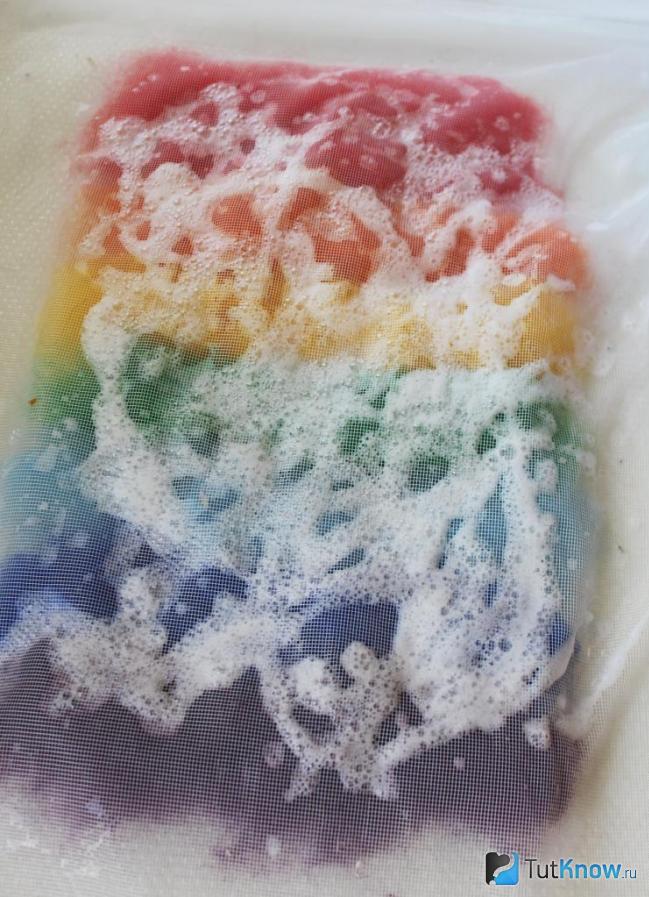
Place a thin layer of white wool on top, slightly backing from the edge. This will help separate the layers. For this, you can use not only this, but also brown and black wool.
Cover the resulting workpiece with a mesh, spray it with water from a spray bottle, and lightly press it with your hands. Cover with bubble wrap and wipe through the mesh again so that the layers adhere well to each other.
Wrap the resulting fabric with a roll.
It's time to reveal the secret of why we didn't cover the red wool with white. When you rolled the canvas into a roll, a figure similar to a comma formed inside it.
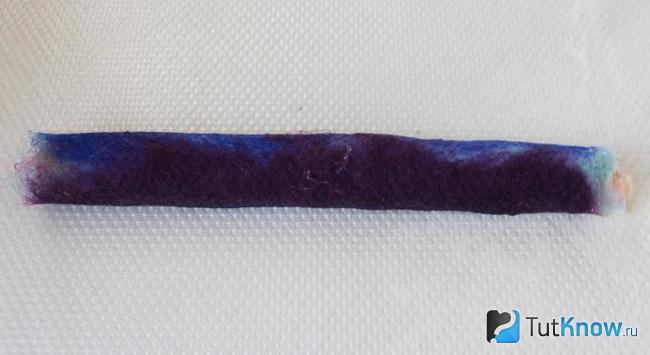
Now you need to wrap the resulting “sausage” in perforated film. Be patient, as this workpiece needs to be rolled for about 5 minutes. Then all layers will adhere well to each other.

Remove the film, now you need to roll this workpiece on a rubber mat. Don't forget to seal the edges too. They should turn out cone-shaped. To do this, these parts need to be lightly pinched during operation.

Wrap the resulting sausage in a terry towel, continue to compact it, rolling it in the towel. To make it even denser, wrap it in a mat and roll it for another half hour.

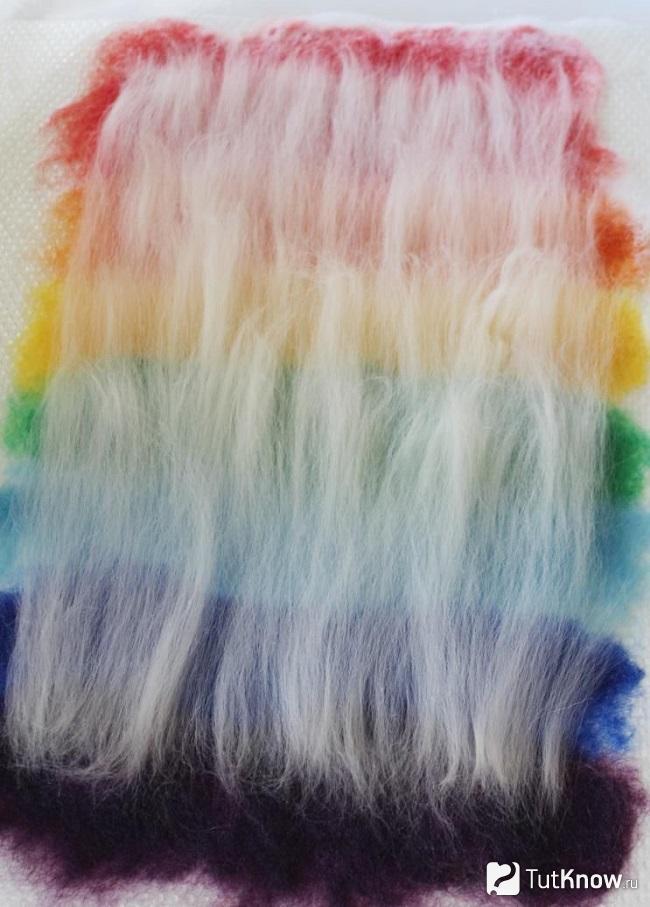
Now you can take out this workpiece, rinse it well in warm water, then leave it until completely dry.
To avoid a musty smell, you need to dry the felt in a warm, ventilated place. It is advisable to first thoroughly blot the workpiece with a towel.
Once this part is completely dry, the fun begins. Take a stationery knife with a new sharp blade and chop this workpiece into circles 1 cm thick.
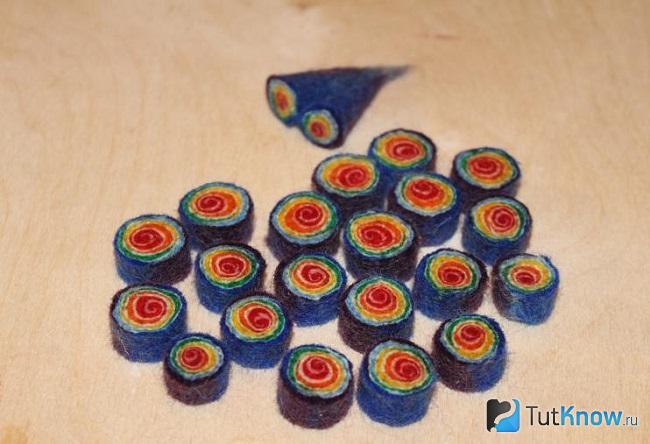
These are the beautiful rolls you will get. It’s good that some of them are of different sizes; when assembling the product, you can place larger elements in the center and smaller ones at the edges.
If you liked creating bead jewelry, then you can look at another interesting way that will allow you to get a different color scheme.
To do this you will need yellow, orange and red wool.
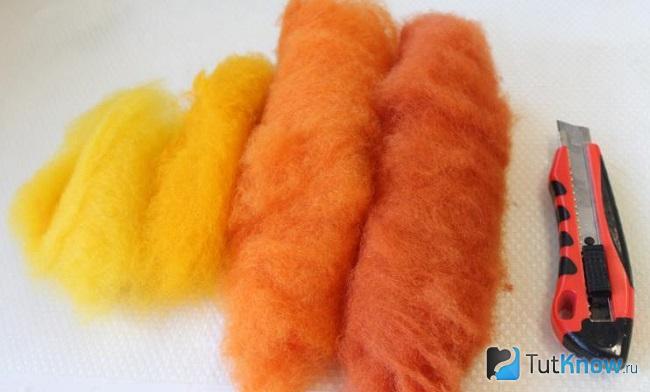
Place a piece of this wool on the work surface. Moisten with soapy water and place bubble wrap on top. Apply the workpiece and wrap it with a roll. Then proceed the same way as in the first master class.
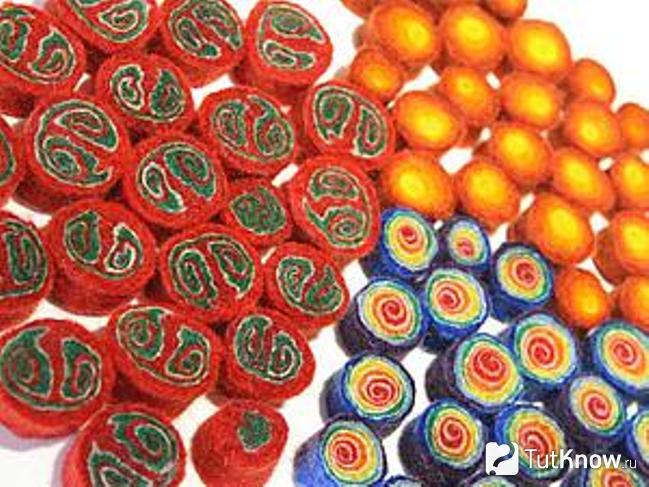
You can experiment with colors and make beads from wool of different textures and colors.
How to make beaded beads?
The next master class will help you create such an airy decoration.

To make a necklace you will need:
- fishing line;
- beads;
- hook;
- scissors;
- clasp.
- The decoration is very simple to make. First you need to string the beads onto the fishing line. Then the resulting “thread” must be knitted, making a chain of air loops. But the loops are not the same. Some consist of 3-4 beads, others are empty (no beads) and contain only a fragment of fishing line.
- After you knit the entire fragment, finish decorating this workpiece by knitting 5 loops of fishing line at the end. Finish securing this piece by tying a knot here.
- In the same way, perform at least 10 elements, making each new component of the beads 5 mm longer than the previous one. All that remains is to thread all the ends of the fishing lines into one fastener and secure them here.

Taking a thin wire, you need to string beads onto it and form them into the frame of a flower, consisting of a core and four petals. Then in the center of each petal you need to secure a larger bead.
Make several of these blanks and fasten them together. This is the first row of necklaces. To create the second one, you need to make hanging loops from small and large beads. Finish the process by attaching the clasp.
The following bead weaving pattern will help you create similar ones. See how to make flowers from six beads by stringing them on a wire. Then twist it and put the same number of beads on here.

Then a third is added to these two petals and so on. In total, this flower consists of six petals and a core. There are several elements you need to complete to create a necklace that fits you. Finally, beads are used to create columns on both sides. A fastener is put on the ends of the wire or fishing line and secured.
But what other beaded beads can you make by taking elements of two colors.

Such neck jewelry can be created from the most unexpected things. Proof of this is the next master class.
How to make beads with your own hands from a T-shirt?
Such knitted items are simply a treasure trove of useful ideas. To make beads, take:
- T-shirt;
- metal ring;
- threads;
- a needle.

If you need to lengthen the elements, you need to connect the ends of two strips and sew them by hand or on a sewing machine.
Let's get started with some interesting work. Form a loop from each strip and attach it to the ring. You need to braid it all with these elements so that the ring is not visible. To do this, attach the strips close to each other.
See what you get - front and back views.

If the ring is in front, then throw the ends of the ribbons over your shoulder and arrange them here, weaving two braids. Tie the remaining ribbons and secure with a hair clip.
You can use not only a T-shirt, but also other things that have gone out of fashion and unnecessarily take up space in the closet. Cut them into strips too and tie them to the ring.

Here's how to make beads from a T-shirt so that they are very elegant. Also cut it into strips. String several large beads onto each one. Sew the strips so that the seam is at the back. Cover it with a piece cut out from a T-shirt. The photo demonstrates how to make such beads.
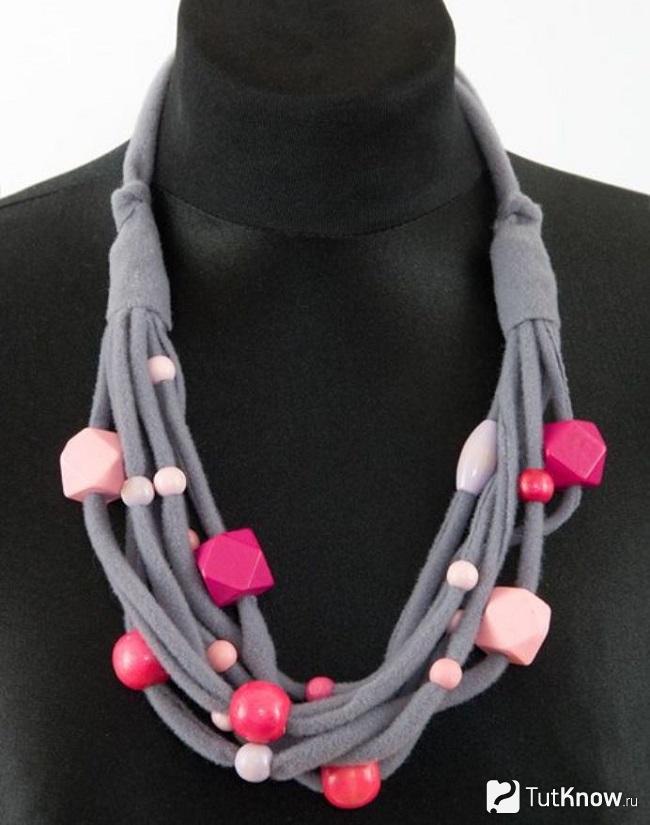
They can be made from an unnecessary thing, designing it in a certain way.

Immediately cut out the triangle with the ties or sew them on later. All that remains is to sew on beads or glue artificial stones and you can try on the jewelry. Do not throw away the pieces of leather left over from needlework; use this material instead of the base.
How to make a necklace from various materials - master class
An original decoration can be created from the most unexpected materials.
From metal circles

To make the next necklace you will need:
- metal mugs;
- ribbon;
- scissors.

Shade the ribbon. Thread the second end as shown in the following photo to secure these two parts of the necklace.

Using this technology, attach the remaining elements, making beads to your size.

All that remains is to attach the clasp and try on the new jewelry. If it is not a necklace, but beads of a sufficient size, then you can not make a clasp, but put them on over your head.
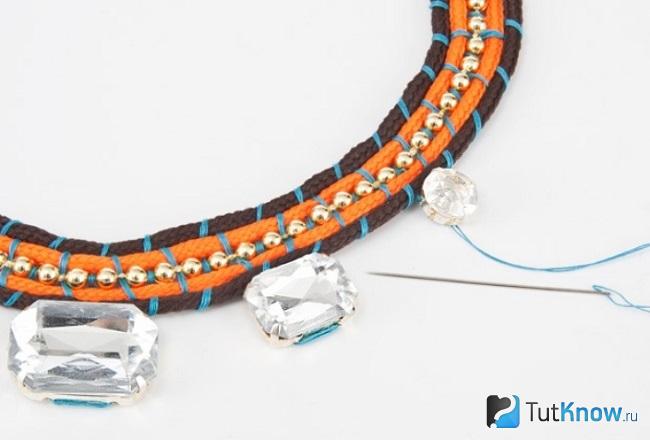
Made of suede and rhinestones
The master class will show and tell you how to make another necklace. It is made using an interesting mosaic technique.

To create one, take:
- broken brooches, rhinestones;
- suede;
- fishing line;
- fabric for lining;
- interlining;
- ribbon to match the fabric;
- threads

Cut out a blank from suede. Place the remaining jewelry and other decorations you have on the front side. First, sew on the largest ones using fishing line and thread, then place the smaller ones between them, and also secure them.

Trim the excess suede with nail scissors, leaving 3mm of this material at the edges.

Glue interlining to the wrong side of the lining fabric, then glue this part to the main one.

Insert ribbon on one and the other side. Sew them on and sew the edges of the product with small stitches.

If you don’t have enough beads to decorate your necklace, then you can paint plastic elements, buttons, shells with hairspray and use them.

From plastic bottles
This is a very interesting option for making jewelry from unnecessary containers.

To make this type of decoration you will need:
- plastic bottles, their caps;
- metal knitting needles;
- scissors;
- buttons;
- hole puncher;
- dye;
- embroidery threads;
- construction hair dryer;
- drill.
Use acrylic paint designed for plastic. Apply it in several layers with a cosmetic sponge.
Cut the bottom of plastic bottles and give these parts the shape of petals. Bring the blanks to a hair dryer and heat them until they take the shape of flowers. If you do not have such a device, hold the plastic parts over the flame for a few seconds. Then paint them the color you want.

Cut leaves from bottles and paint them green. Make a hole on each such element with a hole punch or awl.

Make daisies from the white caps by cutting out their petals with a knife. Hold them near the turned on hair dryer so that the petals bend and take the desired shape. Use a drill to make a hole in the center of each daisy. Paint the cores yellow.

String flowers from plastic bottles, daisies from caps and leaves from bottles onto metal knitting needles so that you get a beautiful necklace or beads.

From paper
You can create very beautiful beads from this cheap material.

To do this, see the following diagram. As you can see, having cut the strips of paper in a certain way, you then need to fold them, and you will get beads of various shapes.

For the first type of such blanks, you need to cut out an elongated triangle, for the second, this triangle must be beveled. For the third, a strip with a narrowed end is cut out. The fourth is a wide strip, the 5th is narrow, the 6th is even narrower. Cut out the seventh and eighth elements in an interesting way. First you need to make a fairly wide strip. For the seventh bead, stepping back a little from the top, you need to make a horizontal slot here. Next, an oblique line is cut from the left point to the left, and from the right point to the right.
Let's look at an example of how to make paper beads. Cut the leaf into long, narrow triangles. Take the first one, wrap it around a wooden stick or a toothpick. Remove from it, you will get something like this.

You need to make several of them.

Now connect the beads to make an original necklace. These skills will come in handy when you make another unusual piece of jewelry.
From pins

Make beads from paper strips in the same way. But don’t close them yet, but wind each strip directly onto a specific pin. To make the necklace double-sided, wrap a strip of paper on each side of one pin.
Now you need to string the pins onto a strong thread, thin elastic band or soft wire and make a necklace.
From laces
The next decoration will be no less original.
To make it you will need:
- laces of different colors;
- needle and thread;
- beads;
- glass pebbles;
- glue.
Sew the laces together to create a fairly wide strip of necklace. Glue the pebbles, sew on the clasp.
These are the beads you can make with your own hands from the most ordinary materials, but the jewelry will turn out to be extraordinary. If you are interested in this topic, see how to make beads with your own hands from fabric:
Here's how to make a necklace from crystals and beads:
Adding a twist to your style is quite simple - it is important to use the right accessories. Handmade jewelry is sure to emphasize femininity and attract attention. Due to their uniqueness, they have a special charm and always remain in trend.
Pearl beads
Necessary materials:
- 50-60 pearl beads;
- silk threads;
- needle;
- carabiner with clasp;
- 2 ends for fastening the fastener.

Beads are made using the knotting technique. You can, of course, simply string beads on a thread, but there are 2 reasons to make the product using this technique.
- The knots keep the beads from rubbing, thereby maintaining their shine.
- Reliability. Even if the beads break, most of the pearls will remain in place and will not be lost.
To secure the end cap, pass the needle into the middle of the device and make a knot, then make another knot on top of it, close the device and begin stringing pearls. This last knot is important, otherwise the end pearl will rub against the metal clasp.


To ensure that the knots lie end to end after each pearl, you can use silk threads, a large needle or an awl, this will help move the knot to the right place to tie there. It is problematic to do this with ordinary threads; they do not slip and are inferior in strength.

When all the pearls are strung, all that remains is to put on the second end. To do this, pass the needle through the back of the device and tie a double knot.

To attach the carabiner you will need round nose pliers.

Beaded beads
Necessary materials:
- several types of beads;
- beads of different sizes;
- spool of fishing line;
- crochet hook;
- 40 sewing pins;
- 2 spiral end caps;
- lock for jewelry;
- sheet of cardboard.

The more types of beads and beads of different sizes you can choose, the more interesting the beads will look.
Assemble the beads onto the fishing line as you like. Do not cut the line from the reel. You need to fill about 5 meters of fishing line.

When the fishing line is full, step back 15 centimeters from its beginning, take a crochet hook and knit the chain with air loops, making sure that 1 bead is placed in each loop, as shown in the photo.

Behind the last knitted loop you need to tie a knot, then step back 15 centimeters and cut the fishing line.
At the next stage, the formation of a multi-level decoration begins. Pin 2 pins to a piece of cardboard. The distance between the pins will be equal to the desired length of the beads. Stick the remaining pins in pairs under the first ones, all the time, slightly increasing the distance between them, as shown in the photo.

You will get approximately 16–20 rows in the shape of a trapezoid. Distribute them evenly. Where the air loops come into contact with the pins, they should not be pinned. There is no need to tighten the line; there should be a smooth sag.
The air loops on the right should be collected from pins onto the hook. Through these loops it is necessary to stretch one of the “tails” left at the edge of the fishing line. Place the end cap and the corresponding part of the lock on it, tie a knot and melt it with a lighter.

Do similar actions with the air loops that are on the left.

Amber beads
- 3 types of satin ribbons 5, 2.5 and 1.5 centimeters wide;
- amber beads;
- 2 decorative rings;
- 6 clamps;
- cabochon;
- jewelry cable;
- needle and thread;
- lighter;
- scissors;
- pliers.

Using a fastener, secure the decorative ring to a piece of jewelry cable.

String beads of the desired length onto the cable and secure the free edge of the cable on the second ring with another fastener. Make the second and third row of beads according to the same pattern, but slightly shortening each subsequent one so that the tiers lie nicely.


From tape of larger and medium width, cut 7 and 6 strips, respectively. The length of the segments is determined taking into account the splendor of the future flower: the longer the pieces, the more magnificent the decorative element will be.

Using a needle and thread to match the ribbons, alternately string the pieces of ribbons folded in half. You need to start with the big ones and end with the smaller ones.

Tighten the thread so that the “petals” press tightly against each other, and roll the workpiece into the shape of a flower.

Secure the flower with a couple of stitches and decorate its middle with a cabochon.

Sew a flower to one of the decorative rings. From a thin ribbon, measure 2 strips of the same length; they will become ties for the beads. Pass them through the rings, fold them in half and tie them at the back of your neck.

Beads made from threads and beads

Required materials and tools:
- a set of identical beads;
- chain with large links;
- ribbon;
- yarn or thread floss;
- scissors, needle.
Wrap threads around the back of the chair.

Having formed a winding of the required thickness, cut it from one edge, while simultaneously holding it by the other so that it does not crumble.

Having determined the middle, fix this place with a thread of the same color as the resulting “tail”. Divide it into 3 equal parts and weave it into a tight braid.

Having obtained the desired length, shape the edges of the braid: make a bandage of the same thickness, and trim off the excess, ensuring that the free ends are the same size.

Using a needle and thread to match the braid, sew the braid with a chain.

Sew beads along the front edge of the braid through equal sections.

Instead of a lock, attach half a ribbon to the chain on its outer links with a hidden seam.

Chanel style beads
Required materials and tools:
- beads with a diameter of 14 millimeters - any quantity;
- pins 3 centimeters long according to the number of beads;
- chain with large links;
- lobster clasp;
- a pair of connecting rings;
- transparent beads;
- pliers, side cutters and round nose pliers.
String beads onto each pin (stud), then a bead.


Having determined the desired length of the decoration, cut the chain. Thread the leg of the pin with the bead into the chain link and bend it with round pliers to form a loop.

Attach several beads to each link of the chain (the number depends on the size of the link and the beads themselves). Having achieved the desired splendor of the decor, attach the carabiner parts to the edges of the chain, using rings as connecting elements.

African style textile beads

Required materials and tools:
- satin cords;
- waxed cords;
- a dozen spacer beads;
- carbine;
- a pair of connecting rings;
- a pair of limit switches;
- scissors;
- glue.
Prepare a base using cords (waxed, satin, soutache) by folding the pieces one to one. The thickness of the workpiece is determined taking into account the diameter of the separating beads.

Using thinner cords of contrasting color, tightly wrap equal intervals of the base warp, carefully tucking the ends under the wrapping layer. Decorate the beginning and end of the “insert” by gluing separating beads.

Decorate the edges of the necklace with end caps. Then attach the parts of the miniature carabiner to the rings.


Necklace made of yarn and chains

Required materials and tools:
- chain;
- yarn 3 colors;
- scissors;
- side cutter

Take 2 unequal parts of a metal chain. You can connect them into one by securing the ends of the shorter part to the edges of the longer one. Fixing is done with thread or previously removed links.


From each skein of yarn, cut 3 threads 2 meters long. Tie threads of the same colors at one end with a knot. Secure the edges of the threads in the area where the chain segments join.


Weave a braid from the threads, thread the outer threads into the links of the chain so that both the metal and soft components of the decoration form a beautiful woven crescent.


Having finished with the design of the chains, the remaining ponytails are woven into a braid of the desired length. The same braid is made on the other edge of the decoration.

Beads "Rainbow"
Required materials and tools:
- 2 clamps;
- castle-toggle;
- colored beads 8 mm;
- yellow beads 10 millimeters;
- jewelry cable - 4 meters;
- side cutters;
- flat cutters.
Weaving pattern:

Fold a two-meter piece of cable in half, thread it through the ring from the toggle lock and secure it with a clamp. To weave beads from colored beads, as shown in the diagram, it is important to follow the color sequence of the elements.

Having achieved the required length, fasten the cable according to the following algorithm: put on the lock, insert the edges of the cable into the ring of the second part of the lock, insert the tails into the lock. Press with pliers, hide the edges of the cable inside the beads, cut off the rest.

To increase the beads by a couple of rows you will need orange and yellow beads and the remaining piece of cable (2 meters). Fold the cable in half and place an orange bead in the middle. Insert one end of the cable into the green bead on the jewelry, and on the other end, put on first the yellow and then the orange beads. Insert the 2 ends of the cable inside the orange one and tighten it. Repeat the algorithm until the end of the necklace.
Fix the edges of the cable with a double knot, then pass them under a row of beads in the necklace and cut them off.

Beads "Blackberry"
Required materials and tools:
- beads 4 mm - 134 pieces;
- chain;
- pins with loops - 2 pieces;
- carbine;
- connecting ring;
- thin wire or fishing line;
- pliers, side cutters, round nose pliers.
First you need to make blanks from beads. By attaching 12 beads to the wire according to the diagram, you get a berry blank. It is important to remember that the first bead in the workpiece is also the final one. You will need 11 such blanks.


A workpiece with 2 loops along the edges is made from a pin and a bead. You need 2 such parts. The chain is divided into 3 parts.
You need to attach a bead with loops to one edge of the chain, and string all the “blackberries” onto the free edge. Afterwards, if necessary, cut off the excess length of the chain and connect its edge with the loop of the second bead with a pin. The outer beads became fixators for the immobility of the central pattern.

Attach chains with corresponding carabiner elements at the end to the loose loops.

Beads “Turquoise Bouquet”

Required materials and tools:
- turquoise beads;
- black beads with a diameter of 6 millimeters;
- metal beads with a diameter of 3 millimeters;
- clamps;
- carbine;
- wire;
- connecting rings;
- round nose pliers, side cutters, pliers.
Bend a meter-long piece of wire in half, secure it with a clamp on the connecting ring, and decorate it with a metal bead.
Place 3 turquoise beads on the ends of the wire, then cross the ends through the black bead. Repeat the algorithm, only the next time you cross the wire, put on a metal bead instead of a black one. Next, put 1 metal bead on each edge of the wire and connect the ends with the same bead. A pattern appeared. Repeating similar steps, weave the decoration to the desired length.


Make a loop on the edge of the product, as at the beginning of weaving. Attach the carabiner elements to the loops using connecting rings.

The problem “the wardrobe is full, but there is nothing to wear” is probably familiar to many. It seems that things don’t even fit into the closet, but you still want to somehow refresh your usual look. In this case, jewelry and accessories come to the rescue: sometimes one large detail is enough to completely transform the entire image. The big advantage is that the accessories do not take up much space, are practically not outdated, and most importantly, you can even make them yourself. Literally using improvised materials, you can create the same stylish jewelry that is sold in expensive designer stores. We bring to your attention several unusual ways to make beautiful beads yourself in a do-it-yourself master class.
How to make beads with your own hands from plastic bottles and other materials
It's hard to imagine, but even ordinary plastic bottles can be used as material for beads. This is a very simple decoration that is more suitable for children's games or as a bright stage outfit. To make unusual “beads” you will need bottoms cut from plastic bottles, and it is better to take containers with a volume of 0.5 liters or less. If you look closely, these blanks look like flowers. You just need to shape them using a hair dryer so that the petals bend, and paint them with acrylic paints.

Another option for jewelry made from plastic bottles looks more “grown-up”, but is also easy to make and suitable for beginners. For it we will need bottles made of green or blue plastic. It is necessary to cut out blanks that resemble petals in shape, and then punch holes in them in a random order with a hole punch. Next, heat the pieces so that they curl up a little. After this, all that remains is to string the petals on a beautiful cord or metal chain with large links.
Beads made from plastic bottles are a demonstration of what spectacular things can be made from scrap materials found in every home. For the next necklace, the plastic blanks will need to be cut into squares of the same size. Next, we heat the workpieces so that they have curved wavy edges. We connect the blanks in pairs and insert a matching bead into the center - we get a beautiful translucent flower. These beads can be used to assemble a spectacular necklace and even earrings.
How to assemble a beaded necklace correctly?
A necklace made from ready-made components is also very simple to make. You can make the simplest “choker” decoration from a cord and beads, which will go well with a sporty and country style.

If you spend a little time, beads and fabric will turn into elegant beads that you won’t be embarrassed to wear on a date.
Leather beads.Genuine leather is an unusually plastic material from which not only expensive accessories are made, but also jewelry. These can be either ethnic style necklaces, decorated with beads and natural stones, or romantic leather floral arrangements. The simplest beads that can be made from leather are simple tubes wound around wooden sticks.
Knitted beads.Knitted jewelry looks very gentle and elegant. They usually consist of several individual elements, such as flowers, tied together using ribbons and decorated with beads and beads. Simple and stylish necklaces are made with crochet - they can look like lace stand-up collars.

You can come up with patterns for finished work yourself, focusing on any knitted products with a pattern, even napkins.
In addition, using a crochet hook you can make useful sling beads for children. This is a special decoration for mom that the baby can play with while sitting in her arms or in a sling. Typically, such beads are made from bright cotton yarn in the shape of fruits or animals. However, using the same technique (crocheting wooden beads) you can also make adult beads, it is only important to choose the right design.
Beaded beads.Beads are one of the most popular materials for making homemade jewelry, with which you can make very elegant little things. This is quite painstaking work, but the result is certainly worth it. Beads make elegant necklaces of various shapes: woven, embroidered, knitted in the form of plaits. In order for the finished product to look good, it is important to monitor the quality of the material and choose only smooth beads without flaws (for example, made in Japan or the Czech Republic).
The so-called beaded air bags look very stylish. This type of necklace consists of several levels of fishing line of different lengths, on which beads, beads and crystals are strung. Usually a monochrome color scheme is used, but if you make such beads from white beads with pearls, you will get a real wedding decoration.

In general, working with beads requires some preparation and skill - this is not the kind of beads that can be made five minutes before leaving the house. For beginners, it is better to start with simple elements, gradually trying something new and more complex. On thematic websites and forums you can find detailed master classes with descriptions of how to weave this or that part yourself.
Don’t be afraid to experiment and embody your wildest ideas - photos for inspiration can be found in fashion magazines and articles about style.
Video on the topic of the article
We invite you to watch a video demonstrating in detail the process of making handmade beads and necklaces.
Costume jewelry is original jewelry made from inexpensive materials that helps complement an outfit and add zest to a woman’s image. Famous fashion designers in their latest collections used not jewelry, but beads made from beads, mastic or shells. With a little time and desire, any girl can master the skill of weaving such jewelry.
What is jewelry made of?
Every woman wants to be attractive and at the same time original. This can be achieved using homemade jewelry. But, before you learn how to make beads with your own hands, you need to familiarize yourself with the details that you will need for jewelry.
Most costume jewelry is cheap because inexpensive materials are used to create it.
It can be:
- Sets of colored or plain beads;
- Wooden or plastic balls;
- A set of large and small shells;
- Colored paper or cardboard;
- Beads made of clay or mastic;
- Marine and semi-precious stones;
- Metal rings and arcs;
- Leather, suede;
- Satin ribbons and regular strips of fabric.
All this can be purchased at the store or made yourself.
You will also need fishing line, thread, scissors and a needle, in some cases glue and an awl, clasps for beads. Before starting work, some materials must undergo pre-treatment. The salt is removed from the shells, the beads and beads are arranged by color and size. Holes are made in wooden balls and pebbles for fishing line or rope. Paper and fabrics are cut into strips or required parts.
After this, you can begin to create a masterpiece.
Paper beads
The simplest and least expensive option is paper decorations. Old magazines and colored paper are suitable for making such beads. If you want to get beads in the form of barrels, then all the sheets are drawn into isosceles triangles with a small base and a large height. For “tubes”, rectangular strips are cut.
How to make beads from paper? First you need to wind the beads. To do this, take a pin or needle, PVA glue and a strip of paper. Gradually wind the paper tape around the body of the needle, starting from the wide side of the sheet.
You need to do this carefully and try to press the paper harder to wrap the layers tightly. The tip should be greased with glue and pressed down well. After this, the bead can be removed from the needle. Having made the required amount, they are pinned onto a fishing line or thread one after another.
Knowing how to make Hawaiian beads, you can throw a chic themed party. This bright attribute lifts the mood and sets the right tone for the entire event. To make it you will need a cardboard template in the shape of a flower and colored corrugated paper.
Having cut out a large number of parts, they are sequentially put on a thread. The tighter the flowers are adjacent to each other, the more magnificent the beads will come out. At the end, all that remains is to tie the ends of the threads and the lei garland is ready!
Jewelry made from beads and seed beads
How to make beaded beads? First, the material is sorted by color and size. Next, you can draw the desired model or color sequence on a piece of paper. After this, the fishing line is cut to the required length and the beads are put on it, one after the other without fixing it in any way.
The remaining ends are tied into one knot and burned with a match. If the thread is short, it is better to use a stationary fastener.
This was the simplest option; you can make more complex things from beads. To weave air beads you will need beads and beads of different sizes and colors, thin fishing line, a crochet hook, a clasp, sewing pins and a thick cardboard box.
First, think through the color combination and overall composition. After this, the beads are strung in the selected sequence onto a fishing line. At the end, you need to leave 50–70 cm for knitting, or it is better not to cut it off from the skein.
From the edge of the fishing line, begin crocheting a regular chain of air loops. The first 2 columns are made without beads, then one ball is pushed forward and a loop is knitted so that the bead is inside. The entire thread is knitted in this way. The resulting chain is divided into even segments.
To do this, draw a rectangle on the box, the width of which corresponds to the desired length of the decoration. The edge of the beads is secured with a sewing pin inserted into the cardboard through a loop. The fishing line is stretched to the width of the rectangle and secured again with a pin.
Do this for several rows until the string of beads runs out. After this, a fishing line is pulled through the loops, which are secured with pins, tightening the rows, and a fastener is attached.
How to make beautiful beads from beads? They can simply be put on a satin ribbon, woven together using macrame weaving knots or knitted in the manner described above. Jewelry made with pearl beads and satin ribbon looks very original. At the edge of the strip, space is left for tying the edges, then a regular knot is used.
The bead is put on a needle, then the ribbon is stitched, again the bead and again the ribbon. In this sequence, the required length is gained. At the end, knot the ribbon again, leaving the ends for tying. If everything is done correctly, the result will be the same decoration as in the photo on the right.
Jewelry made from other materials
After a trip to the sea, you can make decorations from shells. To do this, while on vacation you need to not only lie on the sand, but also walk along the shore, prepare material for your future masterpiece. In addition to shells, you can take interesting colored pebbles, which are also found on most beaches. Arriving home, they are thoroughly washed to remove salt, dried in the sun and varnished.
How to make beads or a bracelet from shells? Holes are made in the prepared material. For a bracelet, an elastic band is pulled through them, and for decoration around the neck, a ribbon, fishing line or thread. To make it more beautiful, you can insert beads or an inexpensive stone inside the shells, securing them with fishing line or glue. All that remains is to attach the clasp and the marine-style jewelry is ready!
Instead of shells, you can put fabric balls on the thread. You can buy them or prepare them yourself. How to make beads from fabric? You can twist beads from scraps using paper stencils.
Wicker jewelry made from old T-shirts or ribbons look original. The principle of macrame is used for knitting; knots, braids and plaits are woven. You can simply cover the existing beads with fabric. In general, who and what has enough imagination.
But those who want to make sweet jewelry will need a little mastic.
Sweet decoration
Typically, crafts made from mastic are used to decorate cakes and desserts, but it is perfect for making sweet beads for kids. This “material” is made from powdered sugar, mixing it with various ingredients: starch, marzipan, egg yolk or gelatin.
The color of the mastic can be any, as it is easy to paint using kandurin. At the initial stage, the material is very plastic; various figures can be cut and sculpted from it. So children will really enjoy this activity.